Our site is reader supported, this means we may earn a small commission from Amazon and other affiliates when you buy through links on our site.
In this guide, we use large crates with many tubes planted with the tops slightly showing. You can use our process below with all dahlias tubers, so if you have dahlias already growing in single pots this process worths just as well. The idea is to take the cutting and get a little scaping of the mother tuber, as well as this, will greatly improve rooting. You can also take a cutting from stems from long shoots when pinching out dahlias but you will need to cut the cutting just under a leaf node instead but the process is still the same. Both types of cutting work well but having a little slice of the mother tuber do seem to be a little more successful.
You can also propagate more dahlias by dividing the tubers in Autumn which we talk about here
When to take dahlia cutting – From March
If you want to take Dahlia cuttings so that you can propagate additional plants, it’s important to start around March. You will need to fill a crate/boxes, pots or trays with potting soil and place your tubers into the potting compost with the top of the tuber showing. You can tightly pack many tubers into one area because they won’t be growing in that particular container for long.
Planting the tuber for taking cutting
Once you plant the tubers you want to water the container you’ve used gently so that the soil around the tubers settles. It’s well worth placing the crates on a heat mat so that they stay warm but this isn’t essential. If there’s any chill in the air they won’t sprout as easily so if you have a particularly cold area you can always cover the tops of the tubers to create a sort of humidity dome around them. Ideally, if you have a greenhouse it will start to feel warm by March as the weather improves.
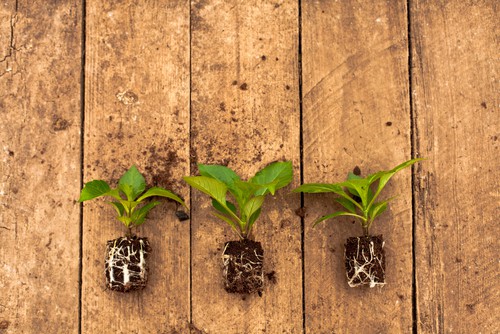
After about 10 days your tubers will start to sprout and another ten days or so after that the shoots should be big enough for you to take your cuttings. Before you take any cuttings the shoots should have at least two sets of fully developed leaves that are at least 8 centimetres in length.
Preparing pots for your new cutting
Before you actually take your cuttings it’s important to prepare a container or a tray with potting compost which is mixed with plenty of perlite or sand to ensure good drainage so that you can start to propagate. At this point, you should take the same heating tray you used for the tubers if you used one and put it under the tray for the cuttings. Dahlia cuttings do much better with bottom heat as it encourages their roots to sprout quickly before the cutting has a chance to wilt.

When you are ready, dig holes with a pencil or a stick directly into each of the spaces where you will place your cutting.
Taking the cutting
In order to take the cutting, you need to make a clean cut at the base right where the fresh growth meets with the tuber and it is for this reason that you leave the top of your tubers sticking out when you first plant them. When you take the cutting you want to cut right at the base where it meets the tuber and make sure you get a small slice of tuber with the cutting. Remove all the bottom leaves just leaving the top set, if these are large you can also reduce these by half too.
Dip the bottom of each cutting into rooting hormone and then place them directly into the holes you have created, again rooting powder is not something everyone uses but we find it can help. The reason you want to make the whole ahead of time is so that you don’t accidentally rub off the rooting hormone when you try to slide the cutting into the space provided.
Label cutting and be patient
If you are growing different varieties at the same time it’s important to label each of your cuttings just as you label each of your tubers so that you know which plants you are growing where. You can also add the date that you took the cutting initially so that you can track how long it takes for roots to develop. In general, it takes around 2-4 weeks for roots to develop so be patient and don’t be tempted to start pulling at the cutting.
As mentioned it should take a few weeks for them to fully develop their roots, you will no there are roots as they will start to develop new leaves and you may see shoots starting to come through the bottom of the pot. At the point, if you used a heat mat you can remove the heat mat because the roots have established themselves effectively. At that point, you can choose to leave them in the pots if you have enough space or transplant them into a larger container. This is really contingent upon the size of the container with what you started and the number of cuttings you are using. We actually like to use 9cm pots with three cutting around the edge.

You can continue to take cuttings from the initial tubers all the way until the middle of April. Each tuber will typically give between 5 and 10 cuttings. If you take any more than that you might deplete the original tuber to the point where they won’t grow when you plant them directly.
Keep cutting moist but don’t overwater
At this point, as your cuttings are starting to secure their root structure, you want to make sure the soil remains moist. If you let the soil dry out your cuttings might wilt and they run the risk of never rebounding. A little trick worth trying is growing the cutting in pots and the pushing 3 flower sticks into the side of the pots and them placing a clear plastic bag other the cutting. This is help retain moisture but be careful not to overwater as they can start to get too damp and rot off.
You can increase the success of your Dahlia cuttings by fertilising them when you transplant them which also helps to combat diseases when they first make their way into your garden.
By regularly taking Dahlia cuttings in the springtime you can quickly multiply the number of beautiful flowers you have in your garden year after year.
Image credits – Shutterstock.com


